Building your own chicken coop is actually a wise decision if you want to save your money and want to enjoy the process. By doing this, you will get full control over the coop. This is not a complicated process at all but you need to understand how to build that properly.
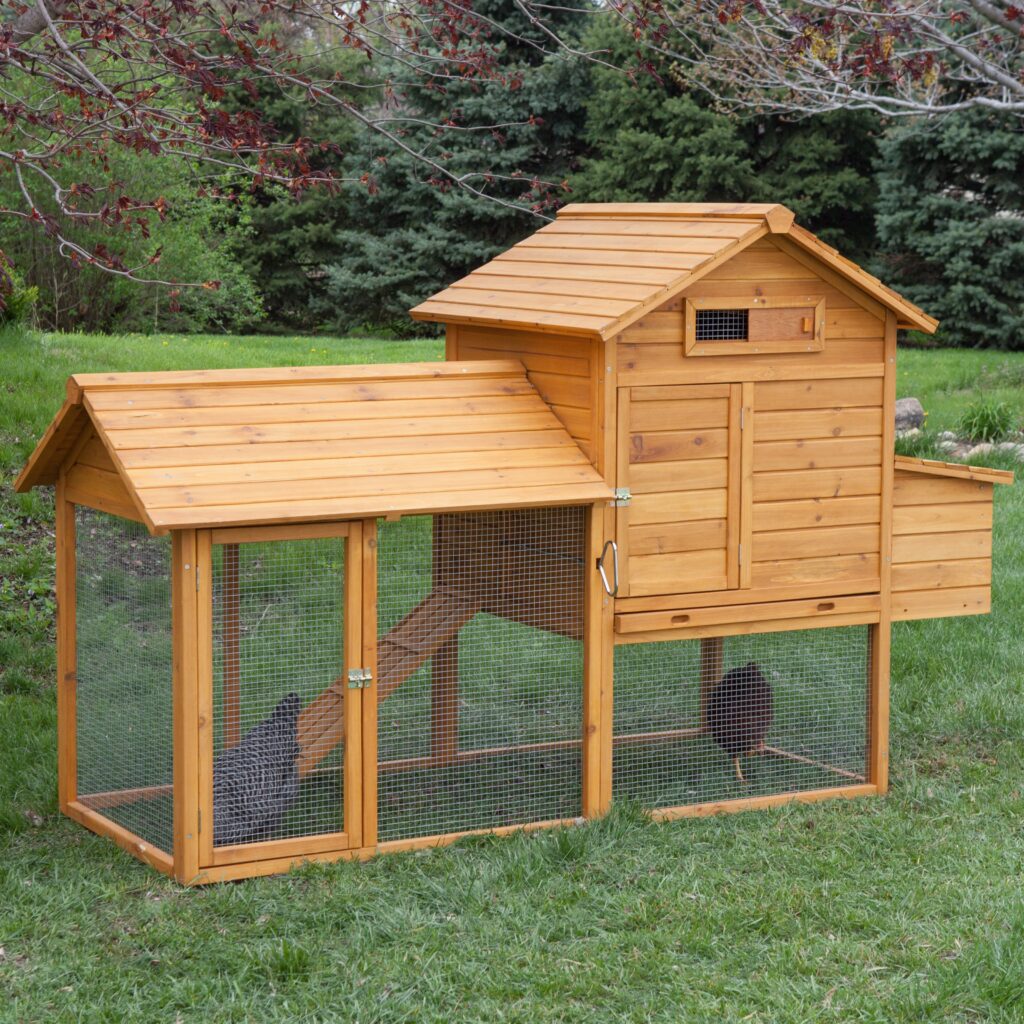
If you are looking for a way of how to build your chicken coop, determining the right type of coop is one of the important points that you need to consider because if you don’t do this, you may need to start to build your coop from the root if there is something wrong. Secondly, you need to consider the right materials and tools to make it. Coops are actually the house of your hens where they will stay safe from any danger, cold and even stormy weather.
Tools and materials
Firstly, you need some tools and the necessary materials to build up your coop. It is utmost necessary to use only the corrosive or the non-toxic materials for the hen’s home.
It should be placed on a dry ground. Wood is the easily available material that you need to build your coop. There may be some other materials but wood is more durable, fast to use, simple to paint on.
- pencil to mark
- hammer
- circular saw
- spirit levels
- paintbrush
- gloves
- few nesting boxes
- minimum 10 feet long measure tape
- tin snips
- sandpaper
- speed square
Plan for size and location
First of all, you need to get the idea that what will be the right location for your coop. You can’t just place it anywhere in your backyard as it is imperative to understand where the windows will be placed. The reason of is the sun can shine through these windows and give the hen warmth that saves effectively you on the electricity bills down the road.
Depending on the size of the shed, you can build it right there in your backyard or in a workshop. The size depends also on the matter that how many hens you are going to keep in the coop.
You need to determine the best position for the purpose always. Look at the sun’s position during the day and decide where to have the windows, as during the winter months the sun will provide warmth. Also, position the chicken coop at an adequate distance from your house so that it doesn’t smell.
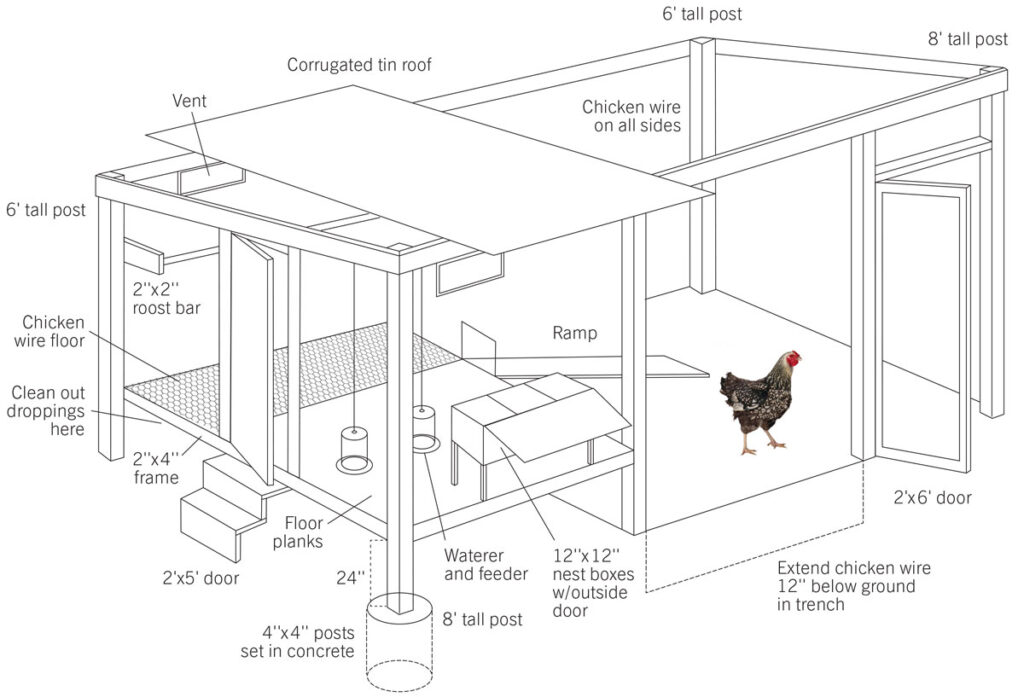
You need to be able to clean the floor of the coop easily so think about your own access, and make sure that the chicken plan you use slops the floor down to access doors so that while you disinfect and clean, it will drain naturally.
You also need to decide on how much insulation is required. Hens are the resilient birds but they are also susceptible to the wet weather and cold drafts. Putting a good solid roof on the coop and then insulating the sides can help you to make sure that your hens are protected and they are comfortable at night and also during storms.
It is also significant to keep your coop well ventilated. A build-up of moisture within the coop can lead to ammonia accumulation and few diseases. Avoid that by ensuring that the door opens inward, allowing the air to flow freely in. You can also place the coop in the right area where it faces the sun so it can dry out during the day.
It is quite important to take into consideration the types of predators you already have in the area. Surrounding the coop with strong chicken wires can do the trick in most of the places. If you are having trouble with the burrowing predators, you can try burying chicken wire about the foot under the ground and all the way around the chicken coop. Almost all the predators dig in the top 6 inches of the soil; this can provide an easy way to stop them without spending lots of money for a concrete base or building up a wooden platform. You need to set 2 to 3 square feet place inside for each hen and also 4 or 5 square feet for each bird as their running space.
Build the frame
If you have planned properly the place, size and materials now you need to proceed to make the frame of the coop.
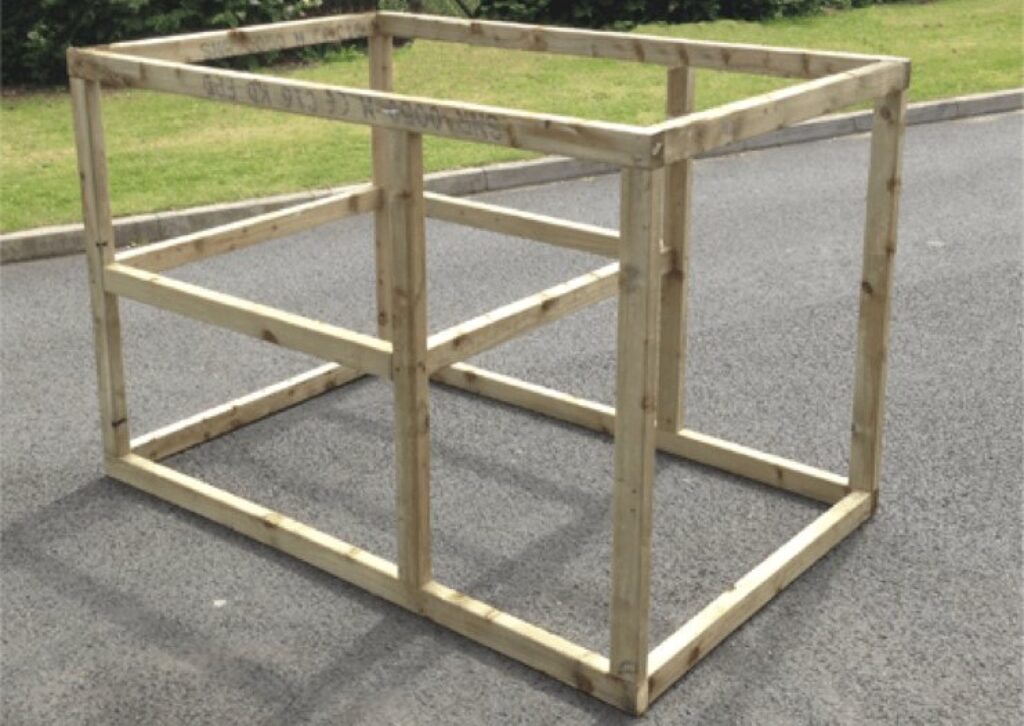
You may start with a rectangular frame and can add different necessary components to it. Rot resistance lumbers are best as these are less harmful to your hens.
- You need four different 4×4 sizes vertical shape posts in a rectangular base on concrete. Fronts posts will be minimum 8 feet tall and back posts are 6 feet. This variation is necessary to install the pitched roof.
- Now add one 4×4 post (6ft) minimum 2 ft distance from the right corner of the rectangular
- Twist one 2×4 screw 2×4 horizontal position on 6 ft post
- Use 2×2 lumbers to make the gate frame and attach it to that corner posts with the galvanized hinges
- Add two 4×4 parallel posts to the left side of that rectangular
- Attach a 2×4 horizontal frame between the heads of all the posts and also along with the back and the front side of the entire structure.
- Attach 2×4 horizontal frames on the left of the rectangular.
- Now set the floor planks on it across a nearly two-thirds portion of the structure and attach them with screws
- Cover the rest one-third area with the chicken wires
- Dig the trench of 12 inches around its perimeter
- Stretch the chicken wires between the posts vertically between the coop as the walls and horizontally between as the ceilings. You need to use the poultry staples to attach them.
- Cover the frame of the gate with chicken wires.
Outfit the interior
A thick layer of the straws is enough as the interior of the coop over its ground. You need to keep some watering devices hang from the rafters. You can add a shade of the cloth on its ceiling made of chicken wires. Just make the sloping ramp minimum 8 inch wide of its ground as the platform of enclosed spaces.
Outfit your coop with different items:
- Lumber made 2×2 roosting bar
- Nest boxes
- One feeder and watering devices
- One incandescent bulb
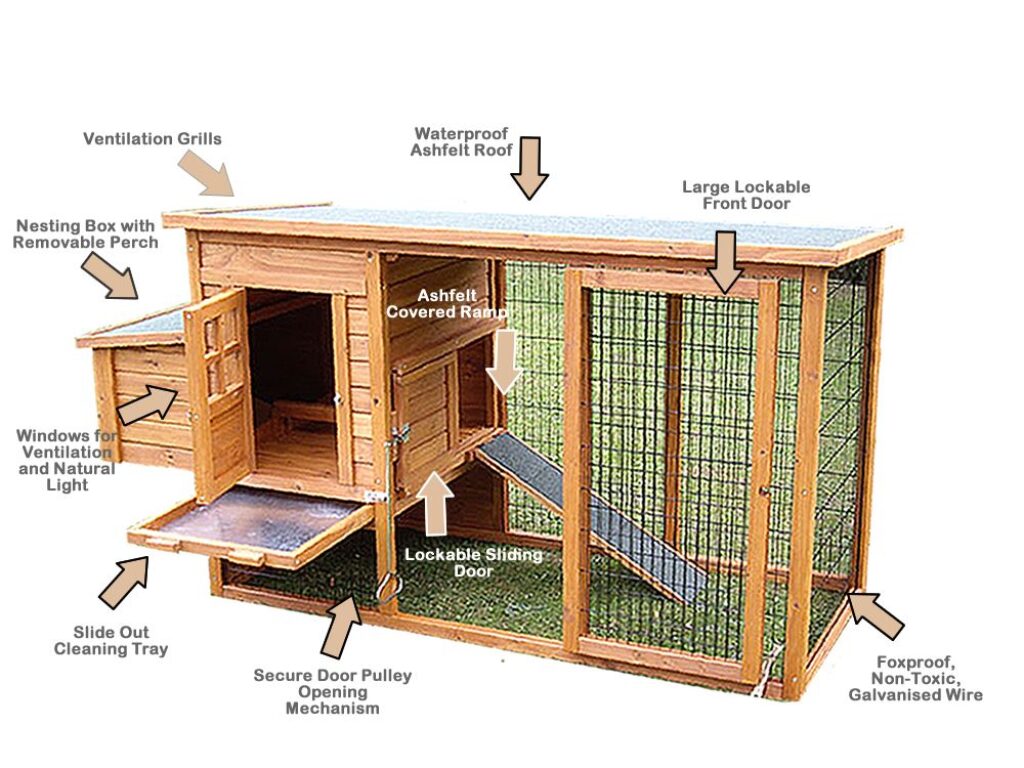
Finish the exterior
Now you need to add the walls and roof for enclosing roosting and nesting area. You need to use a waterproof material but tin comes on the top of the list as you are planning that how to build your chicken coop. As you are planning the walls, make sure that you will get easy access for cleanups and collect the eggs. But the access points should be properly lockable with latches.
For proper ventilation in summer, cover up the door and a certain portion of the floor with the wire mesh and set a space between the roof’s eaves for exiting of the hot air or you can cut vents in the coop near the wall top.